Saturday 6 December 2008

Summary

This post will sum up what I have learnt in the past semester.
I have gone from not knowing anything about using 3dsmax, to creating three images representing 3 different months of the year.
In the first few weeks, I found the program complicated and unforgiving if I did anything wrong. I also struggled to grasp the different views, knowing what one to use when. Through the weeks however I gradually got fast with using 3dsMax and began to learn about some of its more complex functions (i.e. Lighting, hair and fur) and also some of its more fun features (i.e. materials). Whilst I still find the program complicated, I feel capable of making 3d models, and whilst not on a professional scale, they still look decent in my opinion.
My first image October changed considerably during the creation process, and went from being a hill with an evil pumpkin to a slightly more peaceful looking pumpkin patch. The pumpkin took a fair amount of time to get to the right shape originally, however, once I had one pumpkin it as more simple to create the others.
The second image is my least favorite and the one I feel that I could improve. This is my inter scene and also the one I started before the other scenes, however, I put it aside whilst creating the other two because I felt I could learn new techniques in the other scenes to use I the winter one. To improve the scene I would add more items to it and to try different lighting and fog to make it feel more atmospheric.
My favorite scene is April. This scene to me feels bright, cheerful and also fairly comedic. The bee I feel follows quite closely the bee I found and used originally, this combined with the flower, which whilst simple to create looks quite effective, merges to make a great scene.
My three months can be seen below:
April

December
October

April.

I had originally planned to create a wintry scene for February. However, after beginning the image, I felt that it would look too much like Christmas, so I decided that I would go forward a few months and create an April scene.
For the April image, there was one image that I found online which inspired me with the creation of the image, this bee:


To create the bee, I started with two spheres, and changed their scales to make them more oblong and flatter. I then added a striped texture immediately after so I could get a feel to how the bee was shaping out.
Then using the 2d shape tool, I drew some wings and gave them depth to make them 3d. They were then retarded to look like wings. I added legs and antennae (made from cylinders rotated) and also added eyes, which were made from two spheres, rescaled and merged.
I then needed add some flowers in the background. Using a very helpful web tutorial, I was able to make some cartoonish feeling daisies very quickly, from simply combining a rescaled cylinder (petals) clones multiple times, and a cylinder for a stem.
Because the images fee was to be cartoony, it made creating textures simpler as I could make them brighter and with more un-natural colours.
I then added lighting from two directions; one from the left and one from the right facing onto the bee. Finally I created a background with mimicked zoomed in, out of focus grass to add effect.
The final image can be seen below:

Monday 1 December 2008

Christmas Comes

The month of December was completed swiftly after October.
December shows a wintery scene of a cabin set aside two snowmen and a fir tree. Snow lays on the ground and the feeling of cold runs throughout the image.

The image is made up of three main objects. The first object is the snowman. The creation process for this object can be read about in an earlier post., which I is also more of a tutorial. The second object is the cabin, which is made up of a simple cube, with squares beveled into the surface, to create windows. Creating a pyramid, then adding a roof like texture to it, made the roof. Finally I added a chimney by simply creating a very high cube and adding a brick texture.
The tree was created following a tutorial I found online. It involved a very complex process which started by creating a spiral. This spiral then got extended and drawn out, and I had to apply a filter called “hair and fir.

The hair and fir filter gave me many different options to how I could create the most natural tree, and after changing many settings and trying several colors etc. I finally settled on my final choice, which can be seen in the scene below.

The background image looks familiar to my October scene, as I have used the same image, however I feel that yet again it works well. Shadows have been added to the scene to ensure that most of the light falls on the front of the image allowing you to see the front of the image in full.

Tuesday 25 November 2008

The Snowman: Tutorial

I needed to create a snowman for the use in my December scene. Rather than list how I made the snowman, I’ve turned it into a useful tutorial.

1. Start a new 3dsMax scene.

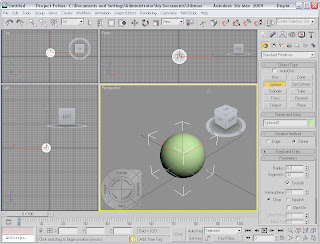
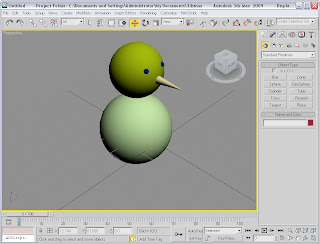
2. Draw a sphere using the geometry tool. Name this sphere “body”


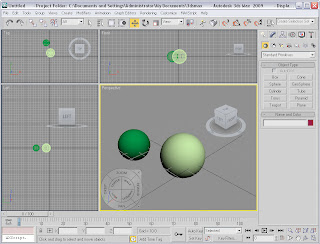
3. Draw a second sphere, smaller than the previous one. Whilst I am not listing dimensions, it is worth mentioning that they need to be proportionate. Name this sphere “head”.

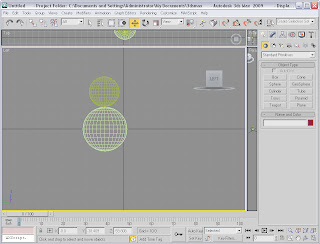
4. You now need to adjust the positioning of the second sphere using the select and move tool so that it is directly on top of the smaller sphere. Make sure that you check the front, top and left/right view to make sure its in the correct place, rather than the perspective viewport.

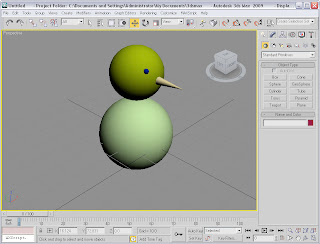
5. Now we need to give the snowman a nose. To create the nose, we start by drawing a cone onto the stage. This is best done in the perspective view.
After drawing the cone, it may be necessary to rotate it so that the point faces away from the snowman’s body.
After rotating the nose, you will most likely need to switch to one of the alternate views and again use the move tool to align it up so it is dead centre. It will be necessary for the nose to intersect the head to make it look more natural.

6. The next important stage for us is to add eyes to the snowman. Start by drawing another much smaller than before sphere. You will then need to adjust it into a position similar to the one shown in the image below using the move tool.

7. To create the opposite sides eye, you will now need to duplicate the first eye. To do this, right click and choose “clone”. Make sure that the box is listed as instance is the one selected, and change the name to “right eye”. Click OK.
A duplicate has now been created, and is actually beneath the current eye. Move the new eye into position using the move tool. The image below should now be similar to what you have so far.

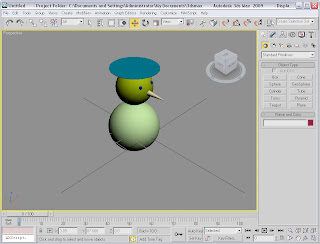
8. Now we have the basics of a snowman, we will add the final piece, a hat.
Start by drawing a cylinder. Make sure that the radius is bigger than the head, but not the body, and that the height is no more than 0.3.
Move this cylinder onto the top of the head using the move tool. Chances are, your snowman should now look like below:

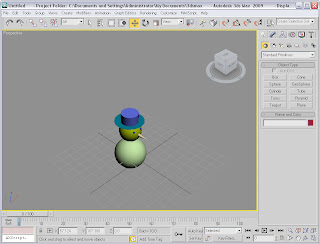
9. Now you need to create the rest of the hat. To do this, create a cylinder with a smaller radius that the last part of the hat, but a much greater height. You snowman is now basically complete, and should look something similar to below:

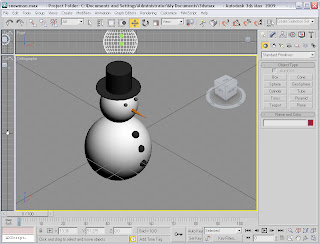
To finish off, add some materials to the snowman to give him colour, and create some buttons, which can be done similarly to when you created the eyes.

Sunday 16 November 2008

October Comes

My first month was finally completed about a week ago.
In the scene, is a pumpkin patch set against the backdrop of a late October evening.
The processes used to create the entire product are as follows.
Firstly, I created the pumpkin, which involved a standard sphere. From this sphere, I immediately gave it a texture. The reason I did the texture first instead of later was so that I could model the pumpkin off a photo of one I found online.
After this I converted the shape to an editable poly and selected the top segments of the shape. Using the extrude function, I was able to make a realistic looking stalk for the pumpkin – I then selected the segments, and coloured them green to finalise the basic pumpkin shape.
I then continued to sue the extrude function with the rest of the pumpkin. This allowed me to add dents and to give the pumpkin a more natural shape.
In a new document, I then created a single flat plane. This was to serve as the ground. I then gave it a bump map, to make it look rougher and more natural. This was done whilst adding a grassy texture, which was obtained from the Internet.
Next, I imported my pumpkin into the scene. This was then duplicated many times to make a group of pumpkins. I then edited each on individually, similar to the creation process to give them a unique look.
I then created a night background in photoshop , featuring a moon and stars and added it to the render.
I then added a camera to give a more first person perspective to my image, and then I finally added lighting from both sides of the scene to give shadows and to make the scene look more realistic.
The final image is below.

Sunday 2 November 2008

SWOT analysis

SWOT analysis -
Strengths:
So far my, strengths in this project have been my use of materials.
In my opinion I feel that I have mastered the art of making textures and materials look fairly realistic.
A good example would be my pumpkin patch. To create the pumpkin skin, I took an image of a pumpkin of the internet and I opened it in photoshop. This allowed me to edit the skin and to make it a slightly richer colour (giving the pumpkin a less realistic look, but making it appear more as you expect a pumpkin). The same material was then applied to all the pumpkins and then each pumpkin had its material separate edited to make the patch look varied.
My other strengths in 3ds max include the use of cameras. I feel that I can change the viewpoint easy and create some unusual and exciting viewpoints. This I feel I will be able to use better when I render my final models.
Weaknesses:
My biggest weakness in 3dsMax, and the most visible is that I find it hard to work out the best way to approach creating a model. Often, I find that the easier way of creating a model is often not he most logical eg. working with a cuboid can often be easier to make obects such as arms, rather than the more obvious cylinder.
Also, I have problems occasionally changing the shape to make it into a more realistic styled shape. A good example would be that i have so far found it impossible to create a realistic looking stick to use as an arm on my snowman for the winter scene.
Opportunities:
I was introduced to a new method of creating realistic models in a recent tutorial. The method is called "bones" and involves me creating an inner structure to an object allowing me to flex the object. This method will help me overcome the stick problem mentioned above.
Threats:
The only obstacle I have come across so far that could cause me problems is that I am using a newer version of 3DSmax on my computer at home, which creates files that are not compatible with the version avaliable to me in university.

Cameras

In the most recent lecture, we were introduced to cameras.
Cameras allow you to choose the angle that your final render will be shown from. A very good use would be to, for example to gve an image a first person view.
To add a camera to a scene, its simply the same as adding a light. Simply click on the camera option, choose "target" and draw the camera where you you would like it to be.
Should you wish to change the perspective to this camera, simply right click on the camera and choose view from camera. When you come to render your object, make sure you select the camera angle you have created, and the object will be rendered in your camera view.

Sunday 26 October 2008

Lighting.

Lighting

Lighting is a complex function in 3dsMax, and its worth noting that it is possible to go to some depths with all the functions of lighting.
What I have learnt is the basics of lighting, enough so that I can create effective lighting on my models to help them appear more realistic.
The two areas that I learnt were:
Omni Spotlights, and Target Spotlights.
Omni Spotlights allow you to light up any part of a scene, working essentially like a light bulb. A good use of such a light would be to place a light from within a pumpkin to create the glow of a Halloween jack-o-lantern, or from inside a window, to create the glow from a house.
The second light type, target spotlight allows you to create light from an angle, either above or below an object. This allows you to create for example the sun shining down onto a object.

Beneath the light options for both of the these further options which you can add to the ligths to give them different effects.
One option, allows you to give the light colour. This could be useful for creating an orange glow for an early morning sunset.
Other options allow you to increase shadows, and their shapes - allowing log shadows for evening scenes etc.
You could also add a "speckled" effect to your images, which could create a rain style effect - this does however increase rendering time, as it renders more information.
Finally, lighting allows you to create atmosphere, which can include fog - I will find this particularly useful for my October image, which will need fog to add a creepy atmosphere.

On learning these new functions available to me in 3dsMax, I now feel that I have barely scratched the surface of this complex program. but I do however, look forward to both learning more about it, and also to making my final models.
I am finding the 3d Modelling complicated myself, and whilst I am creating what I want, its quite a task to create the objects.
I have also found a problem with opening files created by a newer 3dsMax program and the one in the university - This will slow my performance, as I am yet to find a work around.

My only examples of lighting use are not avaliable yet as it is part of my fianl image and not rendered.

Saturday 11 October 2008

A summary so far.

I have been using 3dsmax for just over 3 weeks now and I feel its time to recap over what I have learnt.

So far I have a created a small array of objects, ranging from a chilli, to my red button of doom.
The first few times I have used 3DSmax, I have found it to be fairly confusing, and quite complex, and the camera controls took me a great deal of getting used to.
Once I got to grips with these camera controls and the basics of manipulating a shape into a 3d object, I feel that I am now capable of creating simple ojects and making them look realistic - Coupled with my new knowledge of adding materials, I was able to make these models look much mroe realistic.
I ahve also nwo created a list of models that I wish to create for my calendar product, and have started work on this, by modelling a pumpkin. This has proved to be fairly challenging, as pumpkins have varying sizes and shapes.

Friday 10 October 2008

Rendering.

Rendering is a very important stage when making models in 3dsMax, as it allows you to make your 3D creations look more like the objects your designing them to be.

Rendering is made up of several areas, and you can build a pallet of different materials which will allows you to render every object in your 3d composition.
The material Pallet can be brought up by pressing M on the keyboard, and brings up space for you t create several different render styles.
To create a new render style, you first click on an empty space in the pallet, then from the options below you can choose the type of render you wish to add. The options are:
Blinn – Which creates a shiny plastic like effect on the object
Arisotropic – Makes the object look rougher, detailed and is a good choice on natural objects such as hair
Metal – Makes objects appear with a matt finish
Oren-Nayar blinn – Applies a velvety finish to the object
Phong and Strauss – Produces a plastic effect, but not as well as other filters
Translucent shader – creates a soft illumination like glow to the object

Along with these styles, its also possible to add in your own material from an image that you have downloaded from the internet or even created yourself in photoshop.
To do this, you click the material button and then choose the file that you wish to use and it will apply it to the object that you select.

An example of my use of the processes listed above can be seen below on my creation, which is entitled "red button of doom"

Tuesday 30 September 2008

Lecture 2

In this lecture I learnt several different processes that I cna sue in 3dsmax.
The first that I learnt was how to create a custom 2d shape, allowing me to make different shape 3d objects.
This process required me to draw the shape using the line tool, then converting it to an editable poly, and then extruding the face. In this process however, the shape remained hollow and it was necessary to click the cap button to fill the object in. This gave me a customised shape.
Also, part of this process is the creation of text - which can be customised similar to other 3d shapes - An example is below:


The next process I learnt was the boolean / proboolean operation.
This process allows me to both combine objects together, making a single editable object, or to remove objects from other objects (eg. to create holes) - This process is fairly simple and quite effective - however its best to limit its use, due to it being a very memory intensive process.
An example of this process can be seen below:


The final process that I learnt was the lathe process.
This involved creating a shape using the freehand 2d shape tool, and then moving the pivot point to the start of the shape from the middle, then telling the process to affect the pivot only, you select the lathe option from the modifier panel, and it creates a shape similar to a bowl.

Monday 22 September 2008

My first 3d Model - Chilli's

I made these chillis by starting with a sphere, then choosing the soft selection tool I dragged the points on the shape outwards and rotated vertices around to allow me to get a long pointy shape.
From here, I then went onto the modifier list and chose "bend", which then enabled me to bend the chilli left making it look more natural.

After this, I created a stalk by drawing a cone shape, making it pointy towards the top. I then went again to the modifier list and bent the cone slightly making it look more like a natural stalk. After this, I moved the stalk around to make it in appear in the correct position, then I clicked duplicate, copied three chillis, then chose render, and saved the image thus making the chilli.
My overal opinion is that whilst it does resemble a chilli, that it could look a lot better - a good example of this is that it needs to be a little smoother on the main faces.

Brain Griffin - My Favourite Cartoon Character


Brian Griffin is the family pet of the Griffin's, popular TV series Family Guy.
Ageing just 8 years he has certainly led an exciting life, traveling on an adventure across Europe with a conspiring evil genius baby, to winning a TV dating reality show.
Through the years we have seen him become an established character, overcoming "dog" discrimination, the difficulty of dog problems such as worms and attempting several times to find love.

Did I mention that he can talk?