Tuesday 5 May 2009

The Finale

The final post this semester sums up my work over both semesters, what Ive learnt, and of course showcases my final products this semester.

I started in September with absolutely no 3d experience other than having seen films in 3d at the cinema.
I started out by learning the basics, and built my knowledge from there.
Through a series of blog posts, I built a trio of scenes depicting different months. Looking back at these scenes now, knowing what I know now, I would have created something very different.
In January, we moved on to learnign how to make these scenes come to life through animation procsses.
Learnign a variety of tools, such as cameras, lighting and one of my avourite fucntions, the havoc engine, we weres et the task to create three animated idents for a TV channel of our choice.
Changign what I originally started with in March as my first scene came to life gave me the chance to use 3dsMax to my full potential, and gave me the chance to really see what i could create.
I used new material techniques, played with opacity and discovered the bomb function.
At the end of this process I a left with three scenes, each one differes in style, but each one ahs a similar theme - A rather unlucky company logo simply called "A", as thats what he is, getting involved in some kind of unfortunate action scene in an almsot movie style moment.

The first scene, titles "Temple Of Doom" is a throwback to the Indiana Jones film of the same name, simply involving a ball rolling and crushing the character.
Using the Havok engine, I was able to make a unqiue collision without having to create each frame individually.
The textures and ligting in this scene are my personal favourites, as they create the perfect moood and feel to the aniamtion.
If I was to recreate this aniamtion, I would work on making the hit feel more real, perhaps adding some crakcs to the A on the collision, and I would also work out what causes the mysterious line that appears in the side of the A.


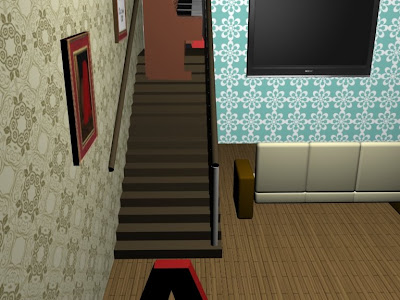
The second scene is titles "Piano Movers". It follows the comic cliche of a piano falling down the stairs and hitting someone. Obviously, in this scene, that somebody is the A character.
This scene involved the most work, as it used a lot of props, required manual animation, and also I ahd issues with the lighting. When cretaing this one, I also changed the camera several times to get a good feel for the scene.
If I was to recreate this scene, i would most likely try to improve the further, and also possibly try the Ink'n'Paint effect on this scene, to see how much it changes it.


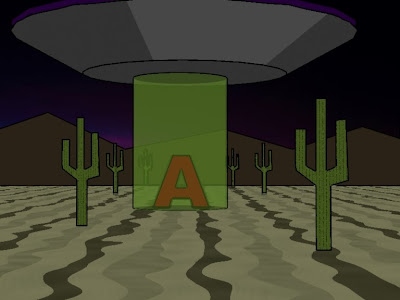
The final scene is named "Alien Abduction". Its a throwback to all those rather cheap and tacky feeling sci-fi movies, documentaries. etc.
The whole animation is suppsed to feel fake, and because of this, be comical.
Using an effect called Ink'N'Paint, I was able to create this unique and unusual look, and it almost feels comic book like.
This is my favourite scene, as it is what feels my most unique.
If I was to change this scene, I think I would add perhaps some string in to make everything look even more prop like, as well as finding ways to enchance the Ink'N'Paint effect further.


Overal, looking back over the last year, it feels like I have gone on quite a journey through the basics of 3dsmax, and I have enjoyed it. I have found it chalenging, and at times I have felt like quiting from it completely, but I feel now that I am capable to going to the next level and evloving my knowledge with this piece of software further.

Wednesday 29 April 2009

Alien Abduction

After a long render process (around 60 minutes), my scene was complete.
To this, I added a soundtrack usign Premiere pro. I had difficulty choosing a good soundtrack, and settled on a track titled "No More Dead Heroes" fro the Halo video game, as it seemed to set the mood, give a bass frequency suitable to a hoverign UFO and even a traction beam sound.
The completed scene is unique comapred to my other two for several reasons, these are:
  • No Bitmaps as textures
  • Ink N Paint applied to every surface
  • No Lighting
  • Undetailed, flat props
However by not having these features, it worked in achieveing an eye catching visual, which seems to fair well with people who see the ident.
The finished scene is shown below:

Wednesday 22 April 2009

Textures and props for the "UFO"

Whilst playing with textures for my alien scene, I discovered an excellent function called Ink n Paint.
This basically applys a comic effect to your 3d models, and I thought it would be a great addition to my UFO scene.
Rater than aim for a realistic design, I could use ink'n'paint to give it a fake style reminiscent of 1950's sci-fi.
To sue this function, you simply click "standard" on the materials box. This brings up a panel from this you choose Ink'n'Paint.
After this you chosoe the colour of the face and its shadow (typically grey, or a darker varient of your first colour).
This is then applied to your shape.
Following this new found effect, and also new direction for the scene, i decided to make the scenery appear fake.
To achieve this, I created a cactus outline, and extruded it. Whilst the objects 3D it feels flat, fake and almost 2d.
This then had the ink'n'paint effect added to it, additionally with a marble texture, creating a stripey cactus style look.
Adding to the scene, i created some fake mountain ranges t go at the far back of the scene, giving the vision of a false horizon, and also added a rather flat billboard. The billboard was important to the cene as it was to be the focus point of the camera after the A mascot had been abducted. The billboard is to show the compnies logo, informing the viewer of what they are watching.
I then applied a marble effect to the ground combined with ink'n'paint, whcih gave the ground a more cartoonish desert feel.
Below is a screenshot of how it rendered:
The scene at this stage was finished, excluding the need to add in a soundtrack.

Thursday 16 April 2009

Space Scene

Having previously built the space ship, I needed to make a scene for it to go into.
The most suitable idea was to use a desert scene, as this seems to be the most commonly associated place with aliens (think Roswell, Area 51 etc.)
I started with one flat plane. This was to serves as the desert floor, and I stretched this out far so that it would look expansive like the desert.
After this, i added my A character to the scene, and imported the UFO. I then animated the spaceship flying in, using simple animation, with the UFO hovering above the A shape momentarily before zooming off.
Once I had done this animation, i created a cylinder and coloured it green, and changed its opacity to 50% making it translucent.
I then animated this growing downwards from the spaceship engulfing the A shape, an then retracting back up towards the spaceship - thus giving the effect that it was begin beamed from the spaceship.
I then animated the A floating upwards during this beams animation sequence. To do this I used the auto key tool, starting with it simply moving up into the spaceship, and then adding random rotations during this process to give it a more natural feel.
The animation at this stage is shown below:
It is worth noting a few things at this stage:
Currently, the textures are poor, mainly because I am unsure how to evolve them to make them look realistic, secndly, theres a very poor backdrop image and finally, the scene feels empty, as it lacks visual content. This will be all addressed in the following week.

Tuesday 14 April 2009

The Piano Falling scene

After much work, and using many new effects shown below I finally created my piano falling down the stairs scene.
This scene lasts for 15 seconds, and involves a combination of jazz music overlaid on itself so that would sound more like a piano falling.
The scene uses one camera which rotates to give the best view of the piano throughout.
The textures are the combination of the architectural ones used in the piano tutorial, and basic images overlaid (wallpaper for example).
The final animation is shown below:

Sunday 12 April 2009

Lighting up your home

The piano falling scene, was in my opinion the most akward scene to light. The main reason for it being so award is that I did not design any windows so there was no way of natural light coming in from the sides, therefore the scene relied soley on lighting from above.
After trying many options, all of which gave me light which created horrible shadows, ruining the scene, I found the perfect light setting.
The light settign which worked for me was a simple "omni light" with a standard multiplier of 1 and a far attenuation of 80 - 200. The shadow density settings are set to 1, which is low, but still creates a slight shadow.

Friday 10 April 2009

The piano goes crash

Originally, the piano was going to fall down the stairs, and it would just stop off of camera. The main reason for this, was that I didn't know how to make it do much else. This however changed, when I learnt about the bomb function in 3dsMax.
Following a tutorial I found online from http://www.spoono.com/3ds/tutorials/tutorial.php?id=2 I was able to make the piano explode into small fragments on impact with the wall. By playing further with the bomb settings, i was able to make the wall crack very slightly on impact with piano to add a final touch of realism.
The outcome of the bomb effect is shown below in the screenshot.