After adding music, changing the brightness settings and adjusting the colour slightly using Sony Vegas Pro I created my finished product for my first ident.
The video shown here is at a lower quality because of size restrictions (the full quality one is 400mb).
The soundtrack chosen coems from the game Halo, and is named "delta halo suite". The tune is an atmosheric one, helping creating a dark, dingy and cold atmosphere.
The scene is made up of a plain for the floor, a 3d letter A, two boxes forming the walls and a large sphere. The sphere has a fair amount of weight added to it so that the reactor engine would create an action that topples the A shape. The rest of this scene is composed of a light (shining from the oint of view of the camera) and a set of textures.
Monday 23 March 2009
Tuesday 17 March 2009
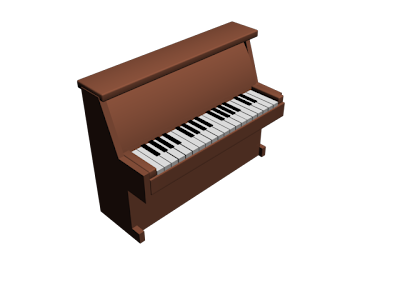
Piano.
For my second scene in which a Piano comes crashing down the stairs, it was important to start by creating the most important object for this scene, the Piano.
This was created by following a tutorial. Its worth nothing that this tutorial not only showed me the creation techniques for creating a piano but it introduced me to a new area in the materials editor, which has helped make my other scenes also, look more realistic.
The process of creating the piano is as follows:
1. Create outline of the piano end using the line tool
2. Extrude this line so that it becomes a 3d object and then duplicating it, spacing them apart to give the width of the piano
3. Next, I created a chamfer box which serves as the base of the piano and another one qhich serves as a base for the keyboard.
4. Next we created a single box, which then I duplicated to make the keyboard, creating a smaller box for on top to serve as the black keys.
5. After, we create another box, which serves as the top of the piano.
6. Finally we create another box to go between the keyboard and the top of the piano. This is first created as a normal box, and then the Bend modifer is applied to give it a curve making it appear more natural.
7. After this, we need to add textures and this is where I learned a new technique.
On the material editor panel I press the button marked as "standard". This then pens a new window up and I choose "Architectural". This then gives me a drop down list of pre-defined material styles, to which I can add either a bitmap or colour, and this gives the objects material the aterial properties of the chosen option. Most importantly, it makes light and reflections look much more realistic.
My finished piano is visible below:
 (LINK TO TUTORIAL: http://tutorial-zee.com/3d-studio-max-tutorials/3d-model-piano-studio-tutorial)
Sunday 15 March 2009
Creating scene 1 part 2, "The temple of doom"
Previously in creating this scene, I ran itno some problems regarding the letter being rendered as completely opaque.
This issue was fixed after many attempts at finding out what the problem was.
The problem was solved by changing the letter A's properties in the rigid body properties box. To fix it, I had to check the box marked "unyielding" and also set the geometry to "concave mesh".
After this, the A was no long opaque.
Continuing from this stage, I added walls to the model, and introduced new textures to the objects to make them feel more realistic.
I then added lighting in two places with an orange glow to give the model the feeling of being in a narrow passageway.
A video can be found below. This video is the render output of this scene.
Friday 6 March 2009
Changes to the animations
During the process of creating my first animation, it came apparent to me that my original three ideas would not work too well with what knowledge I had for 3dsmax.
Because of this, I felt it necessary to head back to the drawing board and to redesign the ideas for the other too images. Also, I feel by changing them I have given my idents a little variety.
Below is the new mock up designs for my two images.
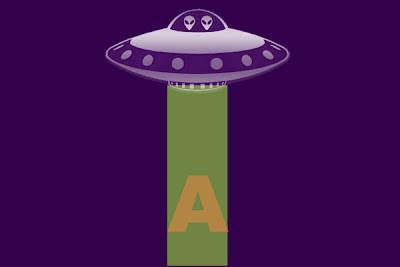
Alien Abduction
This scene involves a spaceship abducting the letter A. The camera will then continue along a path and finish on a billboard with the company's logo on it.
The scenes design will also feature a more unrealistic, cartoony feel material wise, this is to aid to idea of aliens abducting the tv's main character.
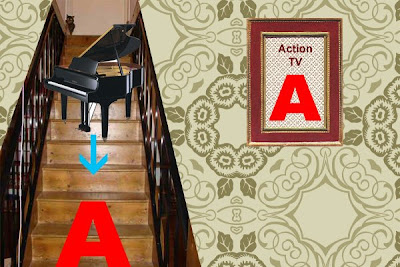
Piano Movers
This scene involves a piano being pushed down a set of stairs, and hitting the character pushing him against the wall. The camera will then move to focus on a wall painting of the companies logo. The textures I will use in this scene will involve more 'homely' textures.
Because of this, I felt it necessary to head back to the drawing board and to redesign the ideas for the other too images. Also, I feel by changing them I have given my idents a little variety.
Below is the new mock up designs for my two images.
Alien Abduction
This scene involves a spaceship abducting the letter A. The camera will then continue along a path and finish on a billboard with the company's logo on it.
The scenes design will also feature a more unrealistic, cartoony feel material wise, this is to aid to idea of aliens abducting the tv's main character.

Piano Movers
This scene involves a piano being pushed down a set of stairs, and hitting the character pushing him against the wall. The camera will then move to focus on a wall painting of the companies logo. The textures I will use in this scene will involve more 'homely' textures.

Creating scene 1 part 1, "The temple of doom"
This scenes purpose is to mimic a very famous scene from the film series "Indiana Jones".
To create this scene I planned to use the reactor engine, so that the ball would look realistic when it hits the A.
Firstly, I created the A, a plane with a slight tilt, and a ball.
Using the reactor engine, I gave the objects mass and chose which ones would not react. I then built the animation from the reactor engine, taking it into the standard animation system for 3dsMax, and I added in my camera.
As you can see, from below, the basic animation is visible but theres a number of rather prominent problems, namely the letter A being transparent.
Sunday 1 March 2009
Reactor (Using the havok engine)
The reactor engine is a very powerful function of 3DSmax.
it allows us to animate car crashes, blocks being hit by balls, realistic tablecloths, and water. It is also possible to animate realistic looking ropes, car movements, an object that break into small pieces when hit or dropped.
to create a simple scene in which a ball hits a few blocks, create a plane, then a sphere (which must hover above the plane, not actually touching) and two cubes (once again making sure they do not touch).
rotates the plane slightly so that it slopes downhill towards the boxes.
next go to the animate menu and choose reactor from the bottom. From the reactor menu choose crate object and select rigid body collection. This will then give you a circle with free boxes in it. This is your rigid body collection just move it somewhere safe in your scene.
You'll notice that on clicking any rigid body collection, but information about it has appeared on the right-hand side under the modify tab. you must now select items to be in this rigid body -- Tick the pig button and select your objects alternately click the add button if you have a lot of objects.
It is important that all objects that you wish to be involved with animation in this rigid body collection.
Next return to the reactor menu and this time choose open property editor. Click on your plane firstly give it a mass of Zero and take the inactive box. Also under simulation geometry click concave mesh.
Next click on the sphere, give this a mass of 100, a friction of 0.3 and choose concave mesh once again under simulation geometry. Finally click on each of your boxes and give them a mass of 0.2 and chooses concave mesh again.
Next return to the reactor menu and click preview animation. You should now have a working animation, if not have a look to make sure that you have followed my advice above.
If you have an animation that you're happy with, choose the create animation button. This is an irreversible process to ensure that you have a backup saved before clicking this button.
An example of a working reactor animation is shown below (this also shows part of one of my scenes that I have been creating).
Subscribe to:
Posts (Atom)